RCL SSL DNS AutoRenew for Windows
V7.1.0
RCL SSL DNS AutoRenew runs as a Windows Service in a Windows hosting machine. The Windows Service will run every seven (7) days to automatically renew and save SSL/TLS certificates from a user’s subscription in the RCL SSL Portal to the Windows hosting machine.
Before you can use RCL SSL DNS AutoRenew, you must have already created your certificate(s) in the RCL SSL Portal using the Azure DNS or Azure DNS SAN option. The certificate(s) that you would like to install must be specified in your configuration of RCL SSL DNS AutoRenew.
Automatically Renew SSL/TLS Certificates
You can use RCL SSL DNS AutoRenew to automatically renew SSL/TLS certificates created in the RCL SSL Portal using the the following creation options :
Install RCL SSL DNS AutoRenew
If you have an older version of the RCL SSL DNS AutoRenew installed in your hosting machine, you should completely delete it and install the new one.
Download the Files
-
The Windows Service files (
dns-autorenew-win-xx) are available in the GitHub Project page in the Releases section: -
Download the zip file with bitness
to match the bitness of your Windows hosting machine
-
Extract the zip file to a folder on your Windows hosting machine after it is downloaded
Configure the Service
Register an AAD Application
An Azure Active Directory (AAD) application must be registered to obtain permission to access a user’s Azure resources (DNS Zone).
Please refer to the following link to register an AAD application:
Set Access Control for the AAD Application
Access control must be set for the AAD application to access resources (DNS Zone) in a user’s Azure subscription. Please refer to the following link to set access control :
Get the AAD Application Credentials
To obtain the following credentials from the AAD application:
- ClientId
- ClientSecret
- TenantId
follow the instructions in this link :
Get the SubscriptionId
Get the Subscription Id in the RCL SSL Portal.
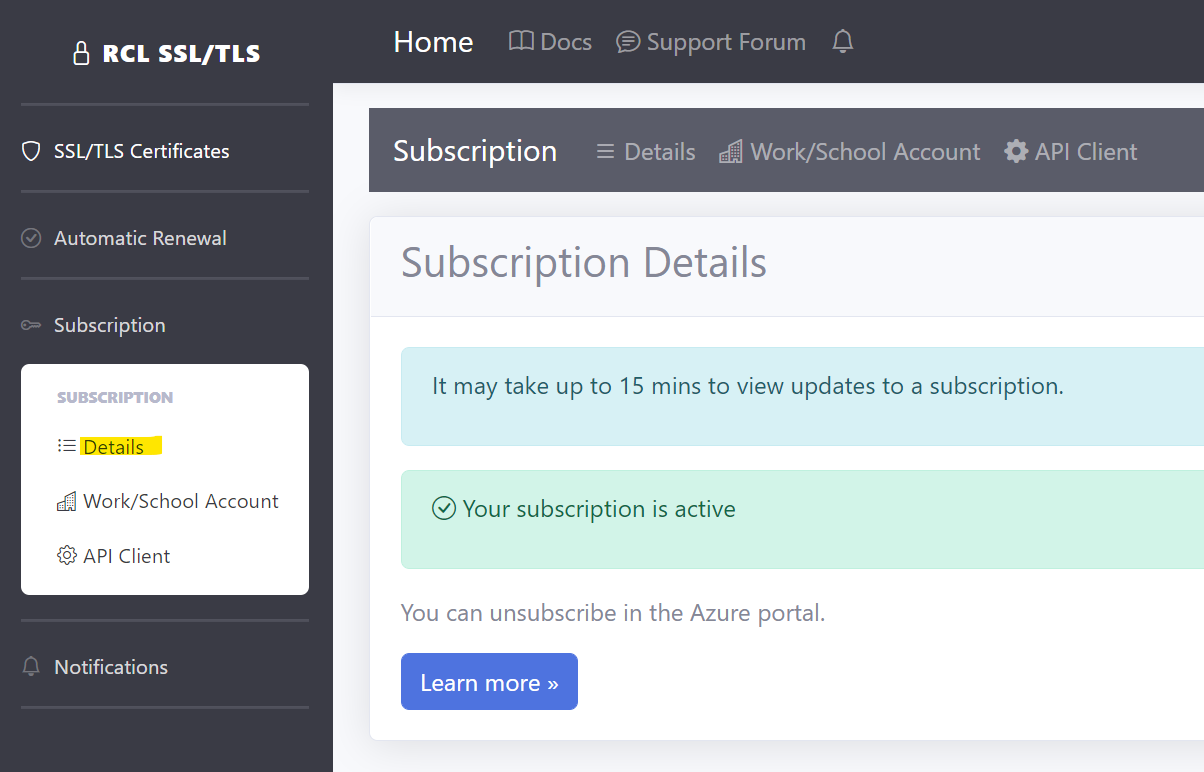
- Scroll down and copy the ‘Subscription Id’

Register the AAD Application’s Client Id in the RCL SSL Portal
The AAD Application must be associated with a user’s RCL SSL subscription. This is achieved by registering the AAD Application’s Client Id in the RCL SSL Portal.
To add the AAD Application’s Client Id to the portal, please follow the instructions in this link :
Add the Configuration variables
-
In the folder containing the files for the Windows Service that you extracted, find and open the appsettings.json file
-
Add the credentials for the AAD Application and SubscriptionId in the RCLSDK section :
- ClientId
- ClientSecret
- TenantId
- SubscriptionId
"RCLSDK": {
    "ApiBaseUrl": "https://rclapi.azure-api.net/v2",
    "SourceApplication": "RCL SSL DNS AutoRenew Windows",
    "ClientId": "23568fghjrtr3",
    "ClientSecret": "7466rggvvdggdff",
    "TenantId": "1103984664",
    "SubscriptionId": "890"
  }
-
In the CertificateBot section, set a folder path to save the SSL/TLS certificates. Recommended path : C:/ssl
- saveCertificatePath
-
Note : when setting the folder path , use forward slashes(
/) in the path name, eg.C:/ssl. Failure to do this will result in inability to run the windows service. -
Create the folder in the server and ensure it has read/write permissions so that the certificates can be saved to it.
-
The
IncludeCertificatesArraysettings will allow for including specific certificates by its name (eg: “contoso.com” or “contoso.com, * .contoso.com” - for SAN) for the certificate(s) you want to save on the server. Multiple certificates must be separated by a semi-colon (;), eg. shopeneur.com;acme.com;contoso.com,* .contoso.com- IncludeCertificatesArray
Example
"CertificateBot": {
  "IncludeCertificatesArray": "shopeneur.com",
  "SaveCertificatePath": "C:/ssl"
}
Example of a configured appsettings.json file
{
  "Logging": {
    "LogLevel": {
      "Default": "Information",
      "Microsoft": "Warning",
      "Microsoft.Hosting.Lifetime": "Information"
    },
    "EventLog": {
      "LogLevel": {
        "Default": "Information",
        "Microsoft.Hosting.Lifetime": "Information"
      }
    }
  },
  "RCLSDK": {
    "ApiBaseUrl": "https://rclapi.azure-api.net/v2",
    "SourceApplication": "RCL SSL DNS AutoRenew Windows",
    "ClientId": "23568fghjrtr3",
    "ClientSecret": "7466rggvvdggdff",
    "TenantId": "1103984664",
    "SubscriptionId": "890"
  },
  "CertificateBot": {
  "IncludeCertificatesArray": "shopeneur.com",
  "SaveCertificatePath": "C:/ssl"
  }
}
- Save the appsettings.json file when you are done.
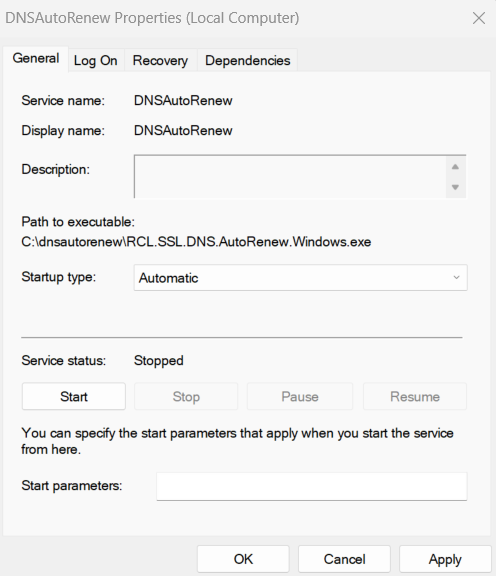
Create the Windows Service
-
Open a Command Prompt in the Windows server as an Administrator
-
Run the following command to install the Windows Service. Replace the < file-path > placeholder with the actual path where your windows service zip files were extracted
sc.exe create DNSAutoRenew binpath= <file-path>\RCL.SSL.DNS.AutoRenew.Windows.exe
Allow the Service through Microsoft Defender Antivirus
Microsoft Defender Antivirus may block the service. You must add the folder that you stored the service files to the Exclusions list in Microsoft Defender Antivirus Scans
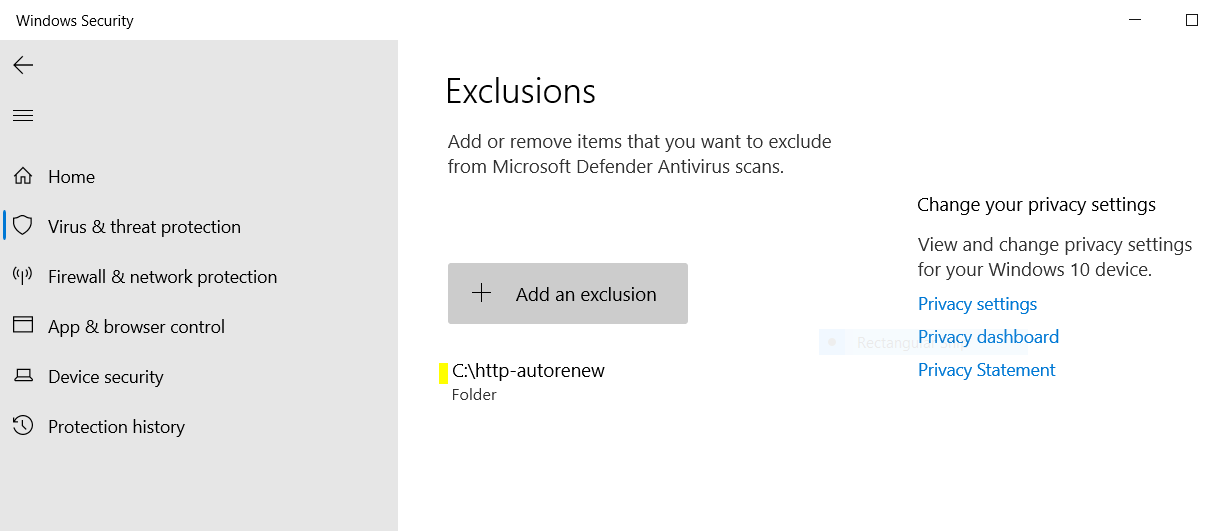
Alternatively, you can run a custom antivirus scan on the folder before you run the service.
Starting the Service
- After the service in installed, open Services in Windows, look for the
DNSAutoRenewservice and Start the service
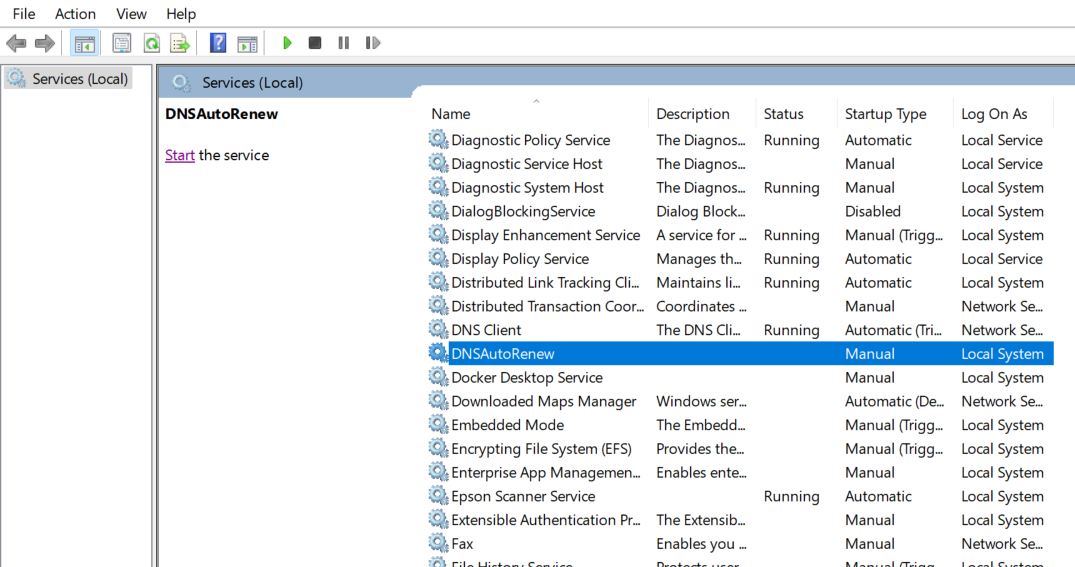
- Set the Properties of the service to start automatically when the hosting machine starts
View the Event Logs
- Open Event Viewer, under ‘Windows Logs > Application’, look for the
RCL.SSL.CertificateBot.Windowsevents
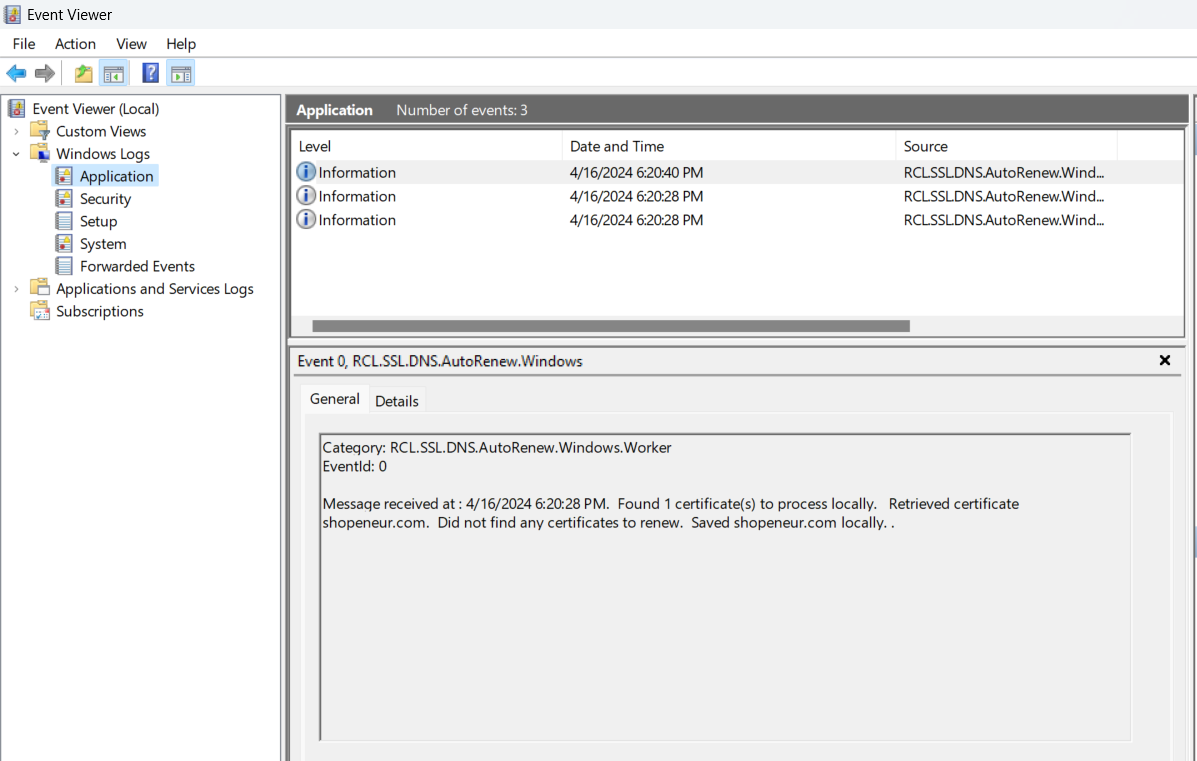
-
Ensure that there are no error events for the service. If there are error events, the service is misconfigured and will not function
-
Each time a certificate is downloaded and saved in the server or a certificate is scheduled for renewal, a log will be written
Fixing Errors
If you encounter error events for the service in the Event Viewer, please stop the service and delete it completely.
Ensure the ‘appsettings’ configuration is correct for the AAD Application and the certificate save path settings point to a folder that exists.
Fix any other errors that are reported then re-install and restart the service.
Deleting the Windows Service
If you need to remove the Windows Service for any reason, run the command to delete the service
sc.exe delete DNSAutoRenew
Updating the Service
If you need to update the service to include other certificates, follow these steps:
- Stop the service and delete it
- Change the
appsettings.jsonfile to include additional certificates - Re-create the service and start it
Reset the Service
If you need to reset the service because of a error or corrupted certificate renewal, follow these steps :
- Stop the service and delete it
- Delete all certificates and their folders in the directory in which certificates are saved
- Re-create the service and start it
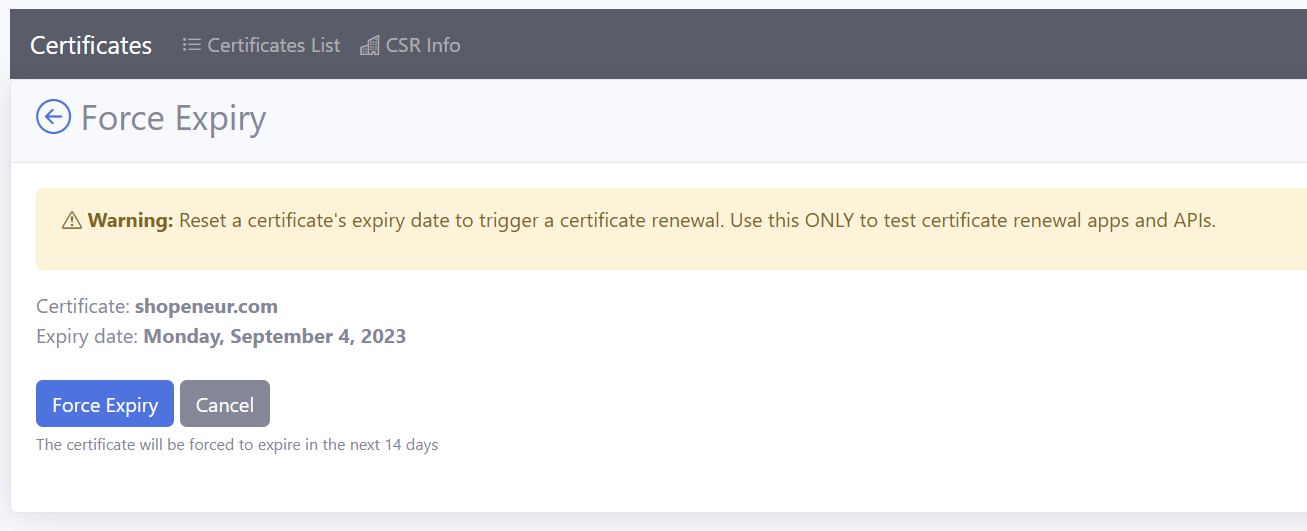
Testing Certificate Renewal
Force Certificate Expiration
In order to test certificate renewal, you must first force certificate expiration in the RCL SSL Portal.
-
In the RCL SSL Portal, click on the SSL/TLS Certificate > Certificates List link in the side menu
-
In the certificates list, click the Manage > Force Expiry link
-
In the
Force Expirypage, click the Force Expiry button -
The certificate will be forced to expire in the next 14 days
Testing Renewal
-
Re-start the service to trigger the certificate renewal
-
Open Event Viewer, under ‘Windows Logs > Application’, look for the
RCL.SSL.DNS.AutoRenew.Windowsevents -
Ensure that the certificate has been scheduled for renewal
-
Wait for 15 mins and re-start the services to save the certificate to the local machine
-
Check that the certificate files are stored in the folder that you specified. Review the section below to learn how the service saves certificate files
-
Once this test passes, the service will run every seven days to automatically renew certificates and save the certificate files to the folder.
Certificate Files
The SSL/TLS certificate files will be stored at the path you specified in the appsettings.json configuration file. In this example, we used the path C:/ssl to store the certificate files.
At this path, a folder is generated by the service based on the certificate name. All the files for the certificate will be stored in this folder.
For each certificate, the following files are downloaded and saved on the hosting machine with the following file names:
certificate.pfx- The PFX certificate fileprimaryCertificate.crt- The Primary Certificate filefullChainCertificate.crt- The full chain certificate filecaBundle.crt- The Intermediate Certificates (CA Bundle) fileprivateKey.key- The Certificate Private Key file
The files are saved in a folder generated by the service based on the certificate name following these conventions :
| Type | Example Certificate Name | Example Folder Name |
|---|---|---|
| Apex Domain | shopeneur.com | shopeneur-com |
| Sub-domain | store.shopeneur.com | store-shopeneur-com |
| Wildcard domain | *.shopeneur.com | wcard-shopeneur-com |
| SAN HTTP Challenge | shopeneur.com,www.shopeneur.com | shopeneur-com-san-www |
| SAN DNS Challenge | shopeneur.com,*.shopeneur.com | shopeneur-com-san-wcard |
Configuring the Web Servers
After, you have installed the Windows Service and the renewed certificates have been downloaded to the specified folder. Please follow the links below to configure your web server to use the certificates files in the folder generated by the service :